I officially lost my West Elm Baggu "dipped" tote after we moved and it makes me want to cry.
(pictured below)

(pictured below)

But rather then crying...correction, after crying I decided to do something about it.
(YEA, that's right, this is a WEST ELM HACK)
(YEA, that's right, this is a WEST ELM HACK)
Most people would just go buy another one, but they are $45 and I am not rolling in the "$$" much these days...hence the DIY obsession:)
SO, instead I bought 3 canvas bags from Hobby Lobby, on sale for $6 and decided to try a different technique on each tote to make my own...and I FINALLY came up with how to do it! (your gonna love this.)
It's as simple as going to Home Depot and buying a can of Plasti Dip. (this stuff is usually made for coating "grip" on tools, but after A LOT of searching, and a little work, this stuff works for your "dipped" bag)
It's as simple as going to Home Depot and buying a can of Plasti Dip. (this stuff is usually made for coating "grip" on tools, but after A LOT of searching, and a little work, this stuff works for your "dipped" bag)
Then it's as simple as masking off your bag....

The bag NEEDS to be painted "full" so you get all of the right areas covered, (if it remains "empty" you wont be able to spray this stuff in to the small crevices) so I simply stuffed a bag of paper into the bottom of the bag to fill it out. You NEED to make sure the bag is "stuffed out" as much as possible. Then I masked it off with painters tape.
The bag on the left is the first bag I tried, which came out REALLY well, with minimal bleeding. I was hoping for that "harsh" straight edge (zero bleeding) though and the blue painters tape really didn't give me it, so I gave "Frog" tape a try. (green tape on the right) And in all honesty, I dont know if it made a difference.
The other thing I made sure to do, was to really press down the edges of the tape, even scrape it down with my nails.... (can you see my "chicken" scratches below?:)
This is the before and after of the first bag...
So here is the only "rough" part about doing this awesome bag...it takes LOADS of layers. So for the first layer, I really LOADED it on! I sprayed and sprayed and sprayed...until I really couldn't see the canvas anymore. Then for the next 3 coats, I would make sure to completely cover it, and then wait a half hour to an hour to let it dry.
For the darker colors, its not as much work, but for red and white...there were TONS of layers.
Here you can see the charcoal/bluish color from beginning to end.
And here is the red one I tried.....
Red coats where A LOT more "involved" plus I messed up (as you can see below and had an "overspray" problem. SO I decided to spray the top red as well, to see what that would look like.)
2 IMPORTANT notes: 1. tape off A LOT higher then I did on the "green" frog tape bags to help in case you do have overspray. 2. If you do go higher, like I did on the red bad, tape of the handles...you'll see I didn't and I don't love the look it made!
Don't know what I mean by "overspray," here is your answer...once using this type of product the spray portion inside the can, can get clogged and cause the spray to come out at different angles or amounts and causes what you see above.
Soloution: or at least it helps to turn the it upside down when you are finished and spray the can. You will notice that after a few seconds nothing is really coming out, essentially you are getting rid of whats in the nozzle, so it wont dry and clump on you. (even do this between your layers)
(you should really do this with all things in a spray can)
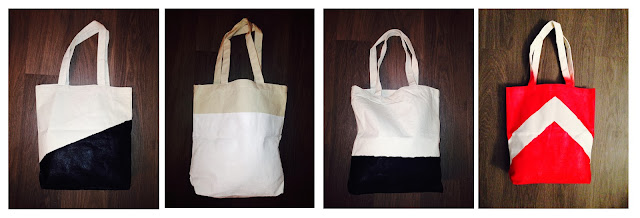
Here is a look at my final bags. I got the BEST line with the white (although its a tad hard to see)
And here is the difference between the black color and the greyish/bluish color:)
(Sorry for the bad lighting:)
Oh can you tell, she also got some new "handmade" scarves as well?:) She does an AMAZING job with my hair...SO I gotta repay her with DIY LOVE!
{Would you be interested in a blog post about crocheting scarves like these? Is that something you could learn off of a post, or would it be too hard? Ive been thinking about doing one, but I wasn't sure! Would love to know your thoughts!}
Have fun HACKING!!!!!!!!


Love this!! I might just have to make a new beach bag. But I want to see you attempt the stencil initial!!! :)
ReplyDelete