Monday, November 4, 2013

"Totes Excited"

I officially lost my West Elm Baggu "dipped" tote after we moved and it makes me want to cry
 (pictured below)

Baggu Dipped Tote

But rather then crying...correction, after crying I decided to do something about it.

(YEA, that's right, this is a WEST ELM HACK)

Most people would just go buy another one, but they are $45 and I am not rolling in the "$$" much these days...hence the DIY obsession:)

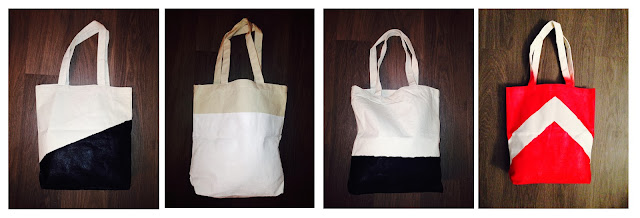
SO, instead I bought 3 canvas bags from Hobby Lobby, on sale for $6 and decided to try a different technique on each tote to make my own...and I FINALLY came up with how to do it! (your gonna love this.)

It's as simple as going to Home Depot and buying a can of Plasti Dip.  (this stuff is usually made for coating "grip" on tools, but after A LOT of searching, and a little work, this stuff works for your "dipped" bag)


Then it's as simple as masking off your bag....
   
The bag NEEDS to be painted "full" so you get all of the right areas covered, (if it remains "empty" you wont be able to spray this stuff in to the small crevices) so I simply stuffed a bag of paper into the bottom of the bag to fill it out.  You NEED to make sure the bag is "stuffed out" as much as possible.  Then I masked it off with painters tape.

The bag on the left is the first bag I tried, which came out REALLY well, with minimal bleeding.  I was hoping for that "harsh" straight edge (zero bleeding) though and the blue painters tape really didn't give me it, so I gave "Frog" tape a try. (green tape on the right) And in all honesty, I dont know if it made a difference.  

The other thing I made sure to do, was to really press down the edges of the tape, even scrape it down with my nails.... (can you see my "chicken" scratches below?:)


This is the before and after of the first bag...
So here is the only "rough" part about doing this awesome bag...it takes LOADS of layers.  So for the first layer, I really LOADED it on!  I sprayed and sprayed and sprayed...until I really couldn't see the canvas anymore.  Then for the next 3 coats, I would make sure to completely cover it, and then wait a half hour to an hour to let it dry.  

For the darker colors, its not as much work, but for red and white...there were TONS of layers.

Here you can see the charcoal/bluish color from beginning to end.

And here is the red one I tried.....
Red coats where A LOT more "involved" plus I messed up (as you can see below and had an "overspray" problem.  SO I decided to spray the top red as well, to see what that would look like.) 

2 IMPORTANT notes: 1. tape off A LOT higher then I did on the "green" frog tape bags to help in case you do have overspray.  2. If you do go higher, like I did on the red bad, tape of the handles...you'll see I didn't and I don't love the look it made!

I also had a little "overspray" problem on the black one above as well...

Don't know what I mean by "overspray," here is your answer...once using this type of product the spray portion inside the can, can get clogged and cause the spray to come out at different angles or amounts and causes what you see above.

Soloution: or at least it helps to turn the it upside down when you are finished and spray the can.  You will notice that after a few seconds nothing is really coming out, essentially you are getting rid of whats in the nozzle, so it wont dry and clump on you.  (even do this between your layers)

(you should really do this with all things in a spray can)

Here is a look at my final bags.  I got the BEST line with the white (although its a tad hard to see)


And here is the difference between the black color and the greyish/bluish color:)


And here is my beautiful friend, Sarah, modeling the canvas bags for us:)
(Sorry for the bad lighting:)

Oh can you tell, she also got some new "handmade" scarves as well?:) She does an AMAZING job with my hair...SO I gotta repay her with DIY LOVE!  

{Would you be interested in a blog post about crocheting scarves like these? Is that something you could learn off of a post, or would it be too hard? Ive been thinking about doing one, but I wasn't sure! Would love to know your thoughts!}

Have fun HACKING!!!!!!!!


Monday, October 21, 2013

Wanna know my secret "gift?"

One of my favorite things in this whole WIDE world is to give gifts.
 I am not talking about just going to Pottery Barn, finding a good smelling candle and wrapping it up and calling it a day. 

I am talking about pre-planning months in advance, careful listening during conversations and then...here is my new secret...

Going to pinterest.com

Here you can get inspired about what they are looking for, or needing; what their taste is, maybe even what their obsession is right now.  ITS BRILLIANT!! (at least I think so:)

(Since my beautiful cousin, Katie just celebrated her special day, I thought I would offer up some tips on making each gift, SUPER SPECIAL and Ill use her as an example!!!)

TIP 1.  Let's face it, you buy this cute wrapping paper or a gift bag and it just goes straight to the trash, such a waste.  But why not step outside the "box" and actually put your gift in something they'll want to  
KEEP, USE and LOVE?!?!? 

Lately I've been using Crates as gift holders, they offer style and function!  I've also used wooden boxes (with lids), which can then become jewelry, key or craft boxes.

(you can find a crate like this at your local craft store and if you want yours to look like this one, feel free to check out my last blog post, on staining.)

TIP 2. (already gave this one away) pinterest.com!  I mean they are basically laying out gift ideas, right in front of you!
For example, I found one that gave easy instructions for a way to "slough" (gross word) off dry feet.  HELLO...she loves anything that sounds like PEDICURE, so I jumped at this one.  PLUS we can do it together, and I can be a little crafty by making the fun bottles!  


(sadly this turned into a #pinterestfail, but as always, we didn't care, we just liked being together)

TIP 3. Being a good listener.  Yes we were taught that as children, but now its really coming in to play!  For example, Katie mentioned earlier this year she was focusing on her living room decor and had asked me for advice regarding a shelf.  
 GIFT = a few items that I thought she would LOVE and that would be perfect on the living room shelf!

TIP 4. REALLY, TRULY learn your friends.  Some are easier then others, and it takes time, but be aware of your surroundings when you are in their home or out shopping with them.  OR even ask them questions to get to know them better.  
For Example, I've learned that my cousins are "listers." They like to write out lists, in order to accomplish items. 
GIFT = ADORABLE notepad, that's sorta "old school" looking and has an AWESOME feature at the bottom.  It has "tear away stubs" that contain fun messages and quotes.  So you can slip one in someones luggage or send one in the mail...or hey, even put one in a bottle;) (talk about multifunctional)


After spending time at her home, I noticed she is organized and spends a lot of time in the kitchen.  
GIFT = chalkboard label jars.
I know she and her husband are avid readers (cause they are my "go to" for book requests).  
GIFT = I found these adorable and funky new bookmarks that look like a sprout is growing out from your book!

TIP 5. My last tip is maybe more about preference, but (as you may be able to tell) I like to give A LOT of items and that can add up to A LOT of $$...so I search out small little things, that I know they'll love, that add up to ONE BIG, FUN GIFT!
Example: As Ive watched Katie shop over the years, Ive learned she likes a little sparkle.  NOT too much, but just a little.  So I had to find some fun, shiny objects that I knew she would love and what girl doesn't like some new jewelry?! 


PLUS I think your gift LOOKS like a WHOLE LOTTA fun this way! So many fun things to unwrap and LOVE:)

 (P.S. Same concept here with my cousin Chrissie! (I think I'd rather give these then get ANY gifts!)

Have fun with it and ENJOY!


Thursday, October 10, 2013

Gel Stain, Changed My LIFE.

I am only SLIGHTLY exaggerating here, but  in all honesty, before my husband, I used to HATE to stain items.

So then he took on side job while out in California where he had to strip and re-stain some dresser's.  This is when he introduced me to Minwax's "Gel Stain" and now I simply cant get enough. (my favorite stain color is "Aged Oak.")

Now a reminder...I am not a professional when it comes to this, but I do have some decent "creds."  While I was in college I had the opportunity of a lifetime, I did my internship with none other then, Pie Town Productions (also known as HGTV.) I worked on the sets of Design On a Dime, Designed To Sell and a few other seasonal shows. (Talk about a dream) so as I said, I may not be a PRO, but I've been there, done that...a few times;)

Okay..so back to the Gel stain, I find this way of staining easy, "semi" foolproof and SO FUN!
(and when my husband makes me go back to the normal stain...I kick, cry and scream...seriously:) 

So in preparation for my next blog, I needed to stain a lovely crate...perfect timing, huh?
Its literally as easy as....
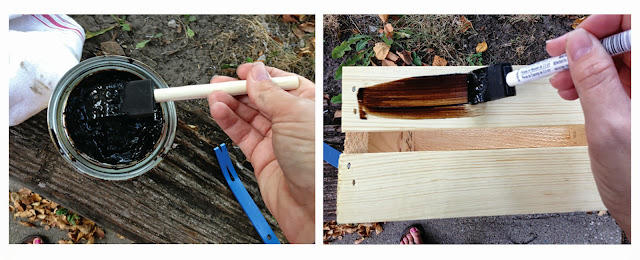
 Dip your brush into the stain and "paint" it on, just make sure you are brushing with the grain of the wood. (very important, otherwise you'll see streaking, or brush strokes)

 Completely cover the piece of wood you are working on,  don't worry about excess because the next step is to wipe the excess of with an old rag. (Just be sure to watch your edges around the wood, as the excess may spill over the sides.)  Again, just wipe it away, if it has dried a little, just use a little muscle and it should rub off. 
 When it comes to nail holes or divets in the wood, I prefer them to be "fully" stained.  If you see in the first picture, I started to stain the board and you can still see some of the natural wood coming through.  My solution is to just press hard with your foam brush over those holes, the excess stain that is inside your brush comes out and...
fills in the holes (as you can see on the left.)  I simply just use that excess stain to keep going on the rest of the board, or if you are already done, just wipe it away with the rag. 

It's literally THAT easy! (at least with Gel stain, that is)
Just remember to continue to go around the box and wipe off the excess (like I found on the outside of my box, as I was staining the inside, shown above) ALSO remember to get your edges, and inside the crevices too!

OH! And one last tip...make sure you use a little "extra" stain when working with big knots, seeing as the grains in the wood are deeper around these sections!

Here is the box finalized (I like to paint the inside) Sorry about the bad coloration on the photo:(  (but you'll see more of this box for my next post!)


Here are two other projects my husband and I stained with the same Minwax, Gel Stain
same color (Aged Oak) to give you a better idea of the coloration....
A BEAUTIFUL headboard for some friends out in California, The Fongs! 
(who we miss dearly)

And a beautiful new bed for our niece,  Delaney!

So did I cover everything? Any questions? Please feel free to let me know!

Enjoy!


Monday, September 16, 2013

CHEAP!! DIY Fall Decor

Listen, I am going to be real honest here 
(and you'll probably stop reading my blog after this...)

"I am not really a big fan of decorating my home for each and every season...yes, that even means for Christmas."  (CRAZY, I know...I've already heard it all:)

BUT...I got a sweet little part-time job at an "Invitation and Gift Store" and these 
girls LOVE to decorate for any occasion
and better yet...
they give me a chance to use my DIY skills and get a little artsy!

SO...here are some ideas for cheap and easy fall decor ideas. 

The most obvious ones are pumpkins, 
the cheapest way to decorate them is with SHARPIE'S (who doesn't love a sharpie, my fav!)
 Now remember what I said in my first blog, I am NOT a perfectionist, so I embrace my mistakes on these pumpkins and I call it adding "character:)" I tried doing herringbone, lace and a more "tribal" look here...oh and I tried herringbone again, because its my latest obsession.

I am also obsessed with doing chalkboard pumpkins...buy one can of spray paint and your good for more then 3 pumpkins. (if not more) I used only one coat AND it dries really fast!  (Every DIY'ers dream)


The next cheap component was fun and SUPER easy.  If you want to give your display some height and take up some of that vertical space, "candlestick stands" are the way to go!

(I made four stands and had a few little extra display pieces for less then $8....YES....
eight dollars!)

"How did you do that?" I hear you asking...it's called Goodwill, Salvation Army or your local thrift store.  Most of the items you see pictured below were about .65 each. unreal.

(plus a few more items not pictured here)

and all I simply did was spray paint both the candle stick and the saucer separately, then hot glued the saucer to the top of the candlestick so the pumpkins have a surface to sit on. (see pictures below) 

I ended up leaving some of the candlesticks "as is" and finding cheap orange candles at Walmart to fill them with.  I also found this AWESOME glass at the Dollar Store, it reminded me of a goblet, so I got it, spray painted it and used in it my display!

The Cheapest thing I did to make the look complete...found some sticks in my yard and spray painted them black.  THAT SIMPLE.  Now I am lucky, my parents basically have their own little forest in their back yard so that was super easy for me.  BUT just go for a walk around your neighborhood, or local park and I'll just bet you find one! 
(otherwise craft stores sell them fairly cheap as well)

Here are some of my display photos.  (I wont post any that have the "stores" items in them, but I took some pics as I was setting up mock displays and before I added "items for sale!") HAVE FUN!

(mock set-up in the kitchen, before I get to the store)
(the black birds were from the Dollar Store as well!!!!!!!!!!!!!)

(mock set-up on the floor, just playing around with heights)

(Getting the window ready, LOVE the branches in a vase with my Dollar Store bird!!!!!)
Enjoy!

Wednesday, August 28, 2013

"dying" for wood...

Hi! My name is Bailey Kuykendoll (pronounced Kirk-en-doll) and I am an Interior Designer who, as the name of my blog states, is a Jack of ALL trades...yet the master of none! And if I am going to be completely honest here, I wouldn't want it any other way.  
(no perfectionist here)

As a young child you really couldn't get me to try anything new, in fact the definition of my name should be changed to "chicken." But THANKFULLY as I have aged, I find myself wanting to give ANYTHING a try!

Okay, enough of the "gibber gabber," lets get on to the first post (yippee!)
In this post we're going to explore "dying wood" with clothing dye, instead of staining. A lot of people are intimidated by staining (another blog post on that later) but I found dying to be pretty much "fool proof!"

I chose to work on a project called "Vintage Calendar" that you can find here on Design Sponge's blog, with a few of my own modifications (obviously the major one being dyed boxes:)

These 3 vintage calendars are done and ready to be used... read below to see how its done.

So, ever since I "dyed" my first piece of wood (see below), I've been itching to try more!  I was just curious to see how it takes bright colors or even black for that matter. 

This one was done with "grey" dye...it has a slight purple tint to it as well.


Here are the supplies you'll need: *please note I made four boxes at once...I decided I might as well turn these little gems into AWESOME gifts! So you will only need one of everything you see!

step 1 
 You can either make your own boxes or run to your local craft shop and buy one that is about 5 1/4" wide (that is the minimum width) 31/2" deep and 2" tall. (they have them at both Hobby Lobby and Michael's for about $2.50 if you're power tools just aren't working today:))


After a few simple cuts (we had some leftover pallet wood as we JUST moved back to the Midwest from California) the boxes can be assembled a few different ways.  We tried wood glue, screws and a nail gun.  The nail gun was cleaner, easier and didn't split the wood (remember these are from pallets, so the wood is a little more brittle)

step 2
the BEST part...dying the wood.

Simply fill up your bucket with water and pour in your dye color.  I chose (from left to right: green, pink and royal blue.) Make sure you have some sort of a stick (I just used leftover wood) for this part, as they dye will "stain" your hands.  

Hold the wood in the water for approx. 5 minutes, but really it's to your specification.  I like deeper, darker colors so I actually held them for a while (and actually dipped them twice)


Here are the colors...this was after I dipped them once, let them dry for about an hour and then dipped them again. (again let dry for another hour)  When the wood is in the water the colors are a lot deeper, once they dry, it usually lightens up! 

Now..
if this was a project that I was making for a kids room, I would be SO happy with the outcome...but I am not a HUGE fan of primary colors in an "adult" home.  SO...I added an additional step.

step 3
stained the dyed boxes.  
I know earlier I said this is for people who aren't big fans of stain, so feel free to skip this step...


But I was looking for a deeper, richer color.  So I simply took my FAVORITE stain (Minwax's Gel Stain, color: aged oak) and put a light coat over top the dry "dye" and then used an old rag and wiped off the excess.  It's a VERY simple process and an extremely simple stain to use, in fact I am THOROUGHLY surprised all stains haven't gone to "gel" yet!


The left photo is the "unstained" box, the right is the "stained" box.  I like the richness it gave the color and then grain of the wood just completely popped!

 step 4 

Modge Podge your box, all over.  This helps protect against stains, plus if there are any "rough" areas that weren't completely sanded down, it will help smooth them out. 


A final shot of just the boxes! LOVE the color and the rough/raw beauty!

OKAY, if you didn't want to take the time and go through the Design Sponge tutorial for the calendar, Ill do a quick and easy run through for you...

step 1
  Grab 365 white 3x5 note cards (I bought 2 packs of 200, which was beneficial, as I had quite a few mistakes!)  I also bought this ADORABLE date stamp (that comes with the arrows as seen below) at Michaels for about $5! And then simply "stamp" you life away

Seriously...
It took me 3 FULL DAYS! But in all honestly doing 4 sets at a time was VERY worth while, cause I would not want to do all those separately!

Then I also got a separate pack of note cards that are "colors" for the separators between the months.


 I could simply leave this like it is, OR I could add a little something to the cards that separate the months...
Who doesn't love washi tape?

If you are doing what I did, and making them into a gift, use a little string, and wrap it up with a nice little card on the front!  Makes a fantastic gift and is LOTS of fun in the process!


One last thing before I go...here is a shot of the box I bought at Hobby Lobby and dyed (this one I didn't stain, seeing as there wasn't a whole lot of wood grain on the box) (the 4th box I kept talking about) This is a little bit bigger, so now I have a place for my pen!;)


Who doesn't like handles?

Any questions, please don't hesitate to ask!
Enjoy.